Saturday, 17 February 2024

Pretty Rad! - Fallout: Wasteland Warfare

Had a quick skirmish game of Fallout: Wasteland Warfare at the game store the other day with one of my regular gaming mates and his friend. I know next to nothing about the Fallout setting but it was plenty of fun with the 32mm figures and excellent terrain my mate had painted.

I played a recently reactivated Protectron (a 'Lost In Space'-looking robot) following the sound of gunfire, which was my mate's friend's survivor and her robot attempting to rescue two captives from a band of mutants. The Protectron got mauled by a mutated guard dog before eventually dispatching the animal with a laser. The survivor managed to shoot several mutants and a second hound, however her floating robot (which looked like a D&D beholder) was shot down. She wouldn't leave it behind to be scrapped by the mutants, so kept fighting hard.

Meanwhile, the Protectron robot had taken many hits (there were torn conduits and wires ripped out, dog bite marks on the paint, bullet holes everywhere ...) and began looking for self-repair items in nearby caches. He wandered into proximity of the captives and, upon taking further hits from a mutant's gun, commenced an audible countdown to self-destruct sequence.

With mere seconds to spare, the survivor managed to kill the last mutant with her hunting rifle and with the danger gone, the Protectron stopped counting, and sought repair assistance from the survivor.

A fun and very easy-to-learn game with a clever dice system for combat and plenty of RPG-style and development elements (including a base-building system apparently).

My only pic from the game was this one of the Protectron looking for useful parts in a vending machine. Apparently there is a dangerous 'Sheepsquatch' about.

The loot obtained: nothing a robot with low Intelligence can use.

Tuesday, 13 February 2024

Pride of the Slovetzian Peoples Air Force - 1/144 MiG-29

One of the the squares on my Hobby Bingo card for 2023 was to complete a plastic scale model kit. Fortunately I had an unbuilt Academy 1/144 scale MiG-29. While I have no compatible scaled gaming miniatures, it will probably do as a piece of terrain for 15mm (1/100 scale) Force on Force (or similar) gaming in the People's Republic of Slovetzia (they will absolutely need state-of-the-art fighter aircraft to deter any interference from America or NATO.

The pride of the Slovetzian Peoples' Air Force, a 1/144 scale MiG-29, with Battlefront Miniatures 1/100 scale infantry. (The scale difference probably won't be as jarring in tabletop battles with distance between figures and everyone focusing on the action).

NATO intelligence reports that they doubt the air-to-air missiles are fully functional.

National markings were hand-painted and turned out ok, if a bit rough. Unfortunately I had to re-do the area around the canopy due to a mistake with blu-tack while trying to protect it from Dullcote frosting (don't put blu-tack on painted minis, and seal plastic model kits before adding the clear parts).

British Army Loyalists counterattack SWoM 1 March 1938 - A Very British Civil War, Chain of Command

This battle was quite a while ago (last year), and was sitting in draft. Here it is, finally:

One of my usual gaming mates had not really played Chain of Command before (maybe once long ago). I kept going on and on and on about how good the ruleset is, so we finally decided to have a game. We played a scenario that would feed into my Very British Civil War campaign setting.

King Edward VIII's men get involved

My opponent took command of a force of British Regulars fighting for King Edward's Royalists, specifically a rifle platoon with some armoured support scraped together from local depots. I took command of an infantry column of the Sheffield Workers Militia (SWoM) with an FT-17 and a field medic.

SWoM riflemen exchanging fire with British Army regulars across the Salteye Brook (all human figures: Peter Pig Miniatures).

Counterattack at Peel Green

As the Manchester Commune's offensive to cut the Mersey Corridor has now commenced in earnest, Royalist regular army forces have moved to counterattack, striking at a gap in the leftists lines near the Peel Green cemetery just outside of the Manchester urban area. The Army unit was able to enter the Eccles neighbourhood and get in behind a SWoM column, which then had to send a reserve platoon back to remove the threat.

The fighting commenced when a section of SWoM riflemen opened effective fire on Army troops who had moved up to a tall garden hedge. Several men on both sides were hit. Taking the initiative, the Corporal of the Army rifle section took three men and attempted to cross the bridge to gain a better position, while the platoon's 2" mortar team attempted to cover the movement with smoke.


At that exact moment, a SWoM tank appeared, heading down the road towards them. ... And the 2" mortar smoke rounds landed off the mark.

(Battlefront miniatures FT-17).

Within seconds it had loosed a 37mm shell which flew directly into the unfortunate soldiers, killing both the lead man and the one behind him, stopping the crossing attempt as soon as it started.

(Paper buildings from Dave Graffam, Microtactix and Wargame Print - all through Wargames Vault).

Seeing a direct attack across the bridge presently unviable, the Army platoon commander instead brought the two other rifle sections and a Matilda I tank across Salteye Brook further downstream and moved these up to attack the SWoM left flank, which was held by more militia riflemen behind a wall.

SWoM militia hold the cemetery wall.

Spotting this movement, the SWoM section leader (who had a submachinegun and was keen on using it!) took one of his nine-man sub-sections and broke from the cover of the cemetery wall to attack the Army troops before they had a chance to emerge from the treeline.

SWoM rashly attempt an assault.

While the SWoM militiamen had the advantage of their leader's submachinegun, the Army troops had a Bren as a counter. In a hard-fought assault about five were killed and wounded on each side, and both section leaders were wounded. The Army were pushed back, but they had blunted the SWoM assault, and had another section plus a tank backing them up.

Badly beaten up in the assault: the British Army lead left flank section.

The remaining SWoM fighters pulled back to the cemetery wall, though in doing so they were fired upon and broken! As they ran back through the gate, they panicked the men of their other half-section, who started to believe they were about to be attacked by an overwhelming Army force. The SWoM section leader was too busy trying to bandage himself and run away at the same time to try to boost their confidence.

SWoM militiamen and their wounded commander flee through the cemetery gate, panicking their comrades.

Regular Army Matilda I (Zvezda miniatures) approaches from the west.

At the same time, an Army Vickers Medium II tank moved through the centre of the town to protect the first Army section and counter the SWoM FT-17. These two tanks met about 70 metres apart and commenced a duel during which they both sustained damage. (I can't remember what happened, but I think the Vickers Medium took a crew casualty but managed to drive off the FT-17).

Regular Army Vickers Medium II (QRF Miniatures) heads through the town to counter the SWoM tank.

A SWoM medic rushed through the gravestones to tend to the wounded left-flank section leader (he had just ran across from the right-flank section where he was providing first aid to that section's leader who'd also been wounded).

Medic Lionel runs through the gravestones, hoping to save his section leader from ending up beneath one (converted Peter Pig Home Guard officer and scratch-built gravestones).

It was too late though - the British Army infantry and Matilda I were able to inflict heavy casualties on the SWoM left flank section and they ran from their position as the little British Army tank crashed over and through the (obviously very lightly constructed) cemetery wall in pursuit.

"Time to get goin' lads!! Get up Jimmy! What'r ye doin'?"

British Army Victory

Somehow (due to very lucky rolls on the Bad Things Happen table) the badly-shot-up SWoM remnants on the right flank were able to hang on for quite some time after the collapse of their left flank, but they were inevitably going to lose, so we called it after a few more Phases.

The SWoM offensive on this part of the Mersey Corridor front is definitely in trouble now, with skilled and armour-equipped Royalist units in their rear. What are they going to do about that?

This was a fun and educational game (educational for me as it turned out), and really showed the impact of wounded leaders, the risks of advancing in the open without smoke cover, and the riskiness of assaulting undamaged sections which still have their section automatic weapons fully operational.

Monday, 12 February 2024

Sponks (what the?) - Horrifying Crab Monsters for sci-fi, fantasy

I have an assortment of odd and cool miniatures from various manufacturers and sculptors picked up over the years that I paint from time to time for a bit of a change from major campaigns.

This week's odd items are the sponks - basically very large crabs that present a danger to anyone operating in sci-fi or fantasy mangrove swamps, tidal lagoons and other coastal areas characterised by mud and shallow, murky waters. These things are extremely resilient and stealthy ambush predators, with powerful claws and an armoured exoskeleton. I got these from Khurasan Miniatures in the USA a long time ago. I coated them in gloss varnish to give them the wet look.

The Sponks from Khurasan Miniatures. With basing tufts from Woodland Scenics.

*clicking and chewing noises*


Sponks attacking a sci-fi Wehrmacht soldier (from Eureka Miniatures).

Your weapons will have no effect.

The Sponks are probably best for 15mm games, but they could potentially work in 28mm games - not as imposingly huge, but still terrifyingly dangerous enough. They could easily take your leg off. (with Militiawoman from Ex Manus miniatures).


French Navy in 1/2400 for Nimitz, General Quarters III, Naval War, etc.

In 2024 the guys in the gaming group will be getting into playing NIMITZ (by Sam Mustafa). Additionally, another group of gamers here play a lot of General Quarters III and I should get into that too. If others are willing to give it a go too, I'd be interested in learning the Naval War set of rules, which looks really good so far - it's free, nicely packaged, and can be found here: (https://www.naval-war.com/).

Due to various circumstances, NIMITZ and WW2 naval wargaming generally will have to be a secondary project for me, so I decided to get just a squadron to participate in multiplayer games. For maximum flexibility, I picked up a balanced group of the available CinC 1/2400 ships for the French Marine Nationale - a navy that nobody else in the gaming group was doing, and a force which could plausibly participate on either the Allied or Axis side, and (with some stretch of the imagination) the Pacific Theatre as well as the Atlantic and Mediterranean.

Marine Nationale expeditionary squadron on fleet exercises (CinC Miniatures).

The miniatures

As is usual for CinC the miniatures are well-made and finely detailed, though of course the gun barrels are a little flexible and potentially fragile. This is less of a concern for ships than for tanks where the barrels overhang the main body, so not too much of a problem. I painted the ships very simply with black undercoat and layered drybrushes of various greys tending up to Silver Grey (illustrations of French navy ships seem almost white). The turret stripe markings are apparently more a thing during the Vichy years, but they look good and will help distinguish my ships on the tabletop.

For the bases, I went with my favoured, cheap method of plastic cut from even and clear sections of takeaway food containers with the ships placed on top of a line of Selleys and then slid forward to give the impression of a bow wave. I was a bit impatient in doing this, so the wave effects are not ideal, but hopefully look fine at tabletop distances.


The squadron flagship is an advanced (though flawed) battleship of the Dunkerque Class,

backed by a La Galissionniere Class light cruiser,
and protected by no less than five state-of-the-art Le Hardi Class Destroyers.


Battlefleet Gothic Tournament - Battlefleet Gothic Part 3

The Battlefleet Gothic 'club' here played a tournament. Three games, nine players, a lot of fun. I managed to come second (though admittedly not all of the nine players got the full three games).

Falcon Guard Main Fleet: 1,000 point Tournament List

For the Tournament List I decided to try out a Battle Barge-centred 'Death Star' or bombardment cannon firepower. Fleet Master Arturuzius, with one re-roll and a Terminator Honour Guard. would lead the fleet on the Falcon Guard flagship Mormaer. Accompanying the Battle Barge were Strike Cruiser Angel Sinistre and Bombardment Strike Cruiser Vigil of Caliban. These would all make use of the Chapter Tactic Siege Cannon to maximise the effectiveness of their bombardment cannon (at the expense of reduced standard weapons battery effectiveness). A Veteran Honour Guard would conduct teleport raids from Angel Sinistre, while three Hunter destroyers rounded out the list.
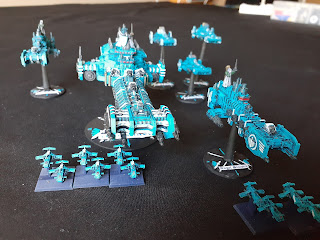
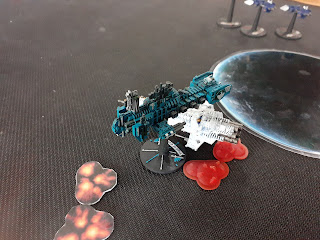
The fleet - three capital ships and three escorts, with capacity to launch five Thunderhawk squadrons, whose main role is CAP and torpedo interception (Models 3d printed locally).


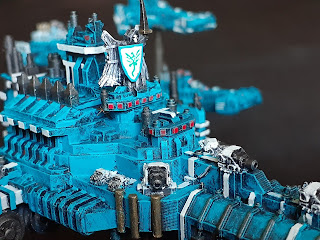
The bridge of the Mormaer, the Falcon Guard flagship, featuring a sinister angel figurehead with hand-painted wyvern shield design.


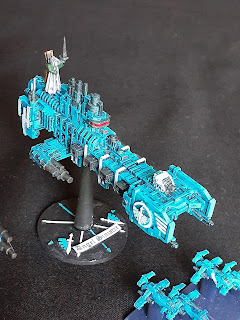
Vigil of Caliban - Strike Cruiser upgraded with additional bombardment cannon to support planetary assaults (and they're handy against ships too).

Angel Sinistre, a standard fitout Strike Cruiser.

The Tournament Battles

Battle 1: An Unexpected Encounter

Responding to unreliable reports of Xenos activity in a system nearby the Joltus Imperial Navy sector, the Falcon Guard fleet dispersed to search for the enemy. Suddenly, a Drukhari fleet sprung from behind asteroid fields and nebulae to ambush the Battle Barge! Angel Sinistre and Vigil of Caliban rushed to support, quickly followed by the Hunter destroyers, while Mormaer alternately manoeuvred and braced to avoid being overwhelmed and destroyed by the concentrated enemy forces.

Despite taking substantial damage and suffering a raid from Drukhari hit-and-run raids and a boarding attempt, Mormaer was able to fight off several volleys and comprehensively defeat the boarders while the Hunters and Strike Cruisers hit the enemy hard, including teleporting Marines aboard one of the Drukhari capital ships. Thunderhawks skilfully intercepted waves of enemy bombers and assault boats. However, Vigil of Caliban, under the unfortunate Ship Master Lucian, was crippled and disengaged.

Several Drukhari escorts were eliminated and both enemy capital ships were crippled, leading to a minor victory for the Falcon Guard. The Drukhari have not been driven from the system, but they took losses from which they will struggle to recover.

The Drukhari ambush is sprung on the Battle Barge Mormaer.

The Strike Cruisers and Hunters smash into the Dark Eldar, while Mormaer can finally bring her guns to bear.

Battle 2: Sink the Bismarck

Remaining in the system, it became necessary to put down a local rebellion. The rebel forces included a substantial naval force of Imperial cruisers, including a Dictator Class Cruiser-Carrier. Ship Master Lucian, who had been in command of the Vigil of Caliban when it was forced to disengage in the prior battle, was now placed in command of the Angel Sinistre and told to redeem himself in the upcoming battle.

The rebel Imperial Navy rebel fleet and the Falcon Guard basically all charged into the centre of the battle area, navigating around nebulae, a small planet and an unexpected warp rift (that's the pile of multi-coloured poker chips). The rebels were able to destroy the three Hunters with a spread of torpedoes, and inflict some damage to the Mormaer. However, the Falcon Guard bombardment cannon inflicted significant damage on several enemy cruisers, causing some to disengage and crippling the enemy flagship, a Dictator Class Cruiser-Carrier.

The Angel Sinistre, commanded by disgraced Leadership 8 Ship Master Lucian, boarded and finished off the enemy flagship before being rammed and crippled in turn by another enemy cruiser. Fleet Master Arturuzius did not consider Lucian's actions to be sufficient to redeem his shame.

However, the Falcon Guard had achieved a crushing victory over the enemy fleet.


The Falcon Guard fleet advances into the centre of the enemy, as the Cobra torpedo boats hide behind the small planet.

Angel Sinistre boards and destroys or captures the stricken enemy flagship (before being rammed and crippled herself).

Battle 3: Supply Run

In the final battle, the Falcon Guard faced off against another ground of Xenos - the T'au - as they both attempted to drop off reinforcement ground units and supplies onto the small contested planet in the system. Unfortunately I forgot to take pictures of this battle, despite the awesome-looking green and red T'au stingray ships.

The Battle Barge and Strike Cruisers sustained some damage but were able to destroy three T'au light cruisers and an escort in return. Ship Master Lucian did moderately well but will still be sent on a penitent crusade. He will be given command of a small squadron, possibly including the rebel Dictator Class Cruiser if its hulk can be repaired.

The result was a draw. The T'au managed to transport slightly more troops and supplies to the planet surface, and the ground battle there will no doubt continue to rage. However, the entire surviving T'au fleet, having delivered it's cargo, opted to disengage rather than stick around and sustain damage, so the Falcon Guard remained in control of the space around the contested planet. Considering the strength of the bombardment cannon, this will no doubt be a great help to the human forces on the planet.


Conclusion

It was great to get the Falcon Guard Astartes fleet on the table again, and to try some different tactics with my newly painted Battle Barge. The Siege Cannon Chapter Tactic can be incredibly effective, although the bombardment cannon are sometimes underwhelming if you're unlucky. I probably did the most damage with boarding actions - the Battle Barge is nearly unstoppable if it's relatively fresh. Speaking of which, it's an all-eggs-in-one-basket situation taking a Battle Barge in a 1000 point list ad definitely limits tactical flexibility. It might also be somewhat inefficient, because I felt I needed to brace regularly to protect it from damage, but this also halved it's firepower upon which my battle plan relied.

Honour Guard and Terminators rarely got the chance to conduct teleport attacks and usually achieved no lasting effect even when they did. Though I'll still probably bring them for the thematics (and they're useful if you have 10 points left over).

Hunter destroyers are probably necessary to cover more space and ensure the enemy does not completely outmanoeuvre and outrun this fleet, but they are significantly more vulnerable and we can expect to lose a few in any hard-fought engagement.

Sunday, 11 February 2024

The Liveries of Others Part I - Painting a few miniature for other guys

I'm not in the business of commission painting (obvious) but these days I kind of like the idea of painting miniatures for other gamers - simply as gifts, or to ensure guys' miniatures are table-ready when they don't themselves have time to paint, or just for myself to try out something different. There was also a 'Hobby Bingo' board I have been referencing that tasks you with 'Painting a miniature as a gift.' Task complete.
Skirmish Sangin Tryout

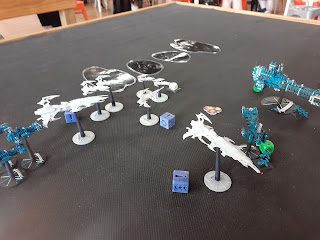
We tried a game of Skirmish Sangin. The rules were quite good for very low-level skirmish games with individual figure activation and no more than a fireteam or section per side in a scale that is not my usual.

US soldier in our game of Skirmish Sangin (Eureka Miniatures). (I didn't paint this one).

Eureka Miniatures 28mm - Afghan Mujahid and Somali Fighter

Following the Skirmish Sangin tryout and intended for future games, the below 28mm miniatures were loaned to me to paint. To do so was quite simple, requiring only a careful application of the brush ('colouring within the lines'). They were spray undercoated white and then coloured with Vallejo paints thinned with Citadel Lahmia Medium and a bit of water. Basing materials are from Woodland Scenics, except the sand, which is from the ground. I could have also coated the minis in Army Painter Quickshade but decided it wasn't necessary.

Somali militiaman and Afghan Mujahideen fighter (Eureka Miniatures).


A couple more Somalis (Eureka Miniatures).


GHQ Miniatures 6mm US Marine AFVs

I got these miniatures as a gift for one of my regular gaming mates who has introduced me to numerous wargame rules and brought a ton of great ideas to my gaming throughout 2023. His 6mm US Marine infantry company was restricted to airmobile operations, lacking any AFVs of any kind (not even HMMWVs - he had to reply on MUTT Jeeps as his only anti-armour support). Hopefully these vehicles will give his forces more options in games of Team Yankee, 6mm Force on Force, or anything else.

These AFVs are intended to represent USMC in the mid-1980s, and while almost all photos on the internet show Marine vehicles in other camo schemes (usually green-brown-black) I picked the scheme I thought looked best and was not too dark. While the vehicles were spray undercoated white, I gave them a Black Brown wash (Vallejo paint with Citadel Lahmia Medium) then used Vallejo US Uniform green, Flat Earth brown, Black and Buff, with a light drybrush of Green Grey. Unfortunately it turns out USMC LVTP/AAV7s didn't get the additional side armour kits until after the intended period for these miniatures, however hopefully they will do. I later discovered CinC actually makes LVTPs without the extra armour, so probably should have gone with them instead of GHQ in hindsight. Anyway ...
HMMWV and AAV7s (GHQ Miniatures).


LAV-25s.


HMMWVs with TOW missiles.

M60A1s.


The storage solution for 6mm vehicles - made with foam, with felt floor and cardboard backing.