Showing posts with label WWII. Show all posts

Wednesday, 24 July 2024

The Liveries of Others III - One last section of Germans awaiting delivery

I painted these guys ages ago for a wargaming friend. It's been a while since our last game, so I haven't been able to hand them over yet. Some of these guys were obviously modelled with camouflage smocks and helmet covers, so I had to paint them up as mid-late war.

Battlefront metal miniatures, all.


Camo at this scale is usually considered kinda pointless, but I still like doing it anyway.


Thursday, 18 April 2024

NIMITZ - 1:2400 Scale WW2 Naval Wargaming

I had my first couple of games to learn the new NIMITZ WWII naval wargaming ruleset by Sam Mustafa (Honor Games), trying out my small (57 point) French fleet again various German forces.

The French Fleet and its Opponents

This was just a learning game for me, so my opponent was not really trying to win - just give a sense of how the rules mechanics worked.

I only took these photos of my French fleet's first battle against a Kriegsmarine force consisting of the battleship Bismarck and several destroyers. Against this, I could field my own battleship, the Strasbourg, with the cruiser Jean Di Vienne and supported by five Le Hardi-class destroyers. The French battleship has all it's big gun turrets forward and all it's light guns rearward, so I always tried to manoeuvre to be pointing at the enemy. I kept everything at high-speed to make the ships difficult targets (the one time I slowed my battleship down, it took a telling hit).

The Marine Nationale got the upper hand quickly by eliminating the outnumbered German destroyers, losing one of their own in the process. The Bismarck then began its duel, surrounded by French ships. The Bismarck's armour was proof against most French weapons, and it was able to sink another destroyer and severely damage the Jean Di Vienne before both sides broke off.

The Bismarck surrounded by French ships (CinC French miniatures and 3D printed German).


The second battle involved the French and Japanese allied together against a combined German fleet. Both sides used their destroyers recklessly as 'shell-magnets' and to get off early torpedo volleys (all agreed this was probably not the way to use destroyers). The action finished before a decisive result, but the Germans were probably winning, because although they lost all their destroyers and had at least one crippled capital ship, they had damaged several enemy and sunk two Japanese light cruisers plus some destroyers.


Rules Discussion

Overall, the surface engagement rules (the Nimitz component) were very good, and everything you expect from a Sam Mustafa game: easy to learn, simple to play, very efficiently and cleanly designed. Everyone had fun and never once needed to check the rulebook. Nimitz was more my style than General Quarters III I previously tried, mainly because of the simple movement mechanics (in GQIII you have to account for every knot of speed and 5 degrees of turn angle).

There are some things that players used to more intricate naval wargames won't like (specifically, Nimitz eliminates fine details of things like ranging-in, spotting/distinguishing fall of shot from multiple firers, and hit location and damage, and it completely ignores anything to do with command and control). However, it is easy to see how these can be eliminated in the interests of speed and simplicity of play while ensuring that the battle still proceeds plausibly (e.g. do ranging shots really matter, when a full volley will almost inevitably follow in a pretty reasonable timeframe?)

The Halsey campaign game

The Halsey component we have yet to try out but it looks very promising. It is a 'campaign' game with a zoomed-out map to cover searching over large distances, aircraft, aircraft carriers, submarines, and all the missions that naval engagements are really fought about, such as convoys, amphibious operations etc. I think an operational-level campaign could easily be accomplished using Nimitz (and Halsey) for the naval and air components and Rommel for the land components, so I will begin to develop some ideas.

Would I house-rule Nimitz? (In short: No (But I might try to write my own system too))

Having played only two games and having done limited research on WWII naval combat, I think it would be greatly premature and unwise for me to actually implement any changes to the rules at this stage. The only things I could think of that I might possibly change would be 1) adding some command & control mechanic (and a 'bridge' critical hit), 2) a negative modifier for multiple ships firing similar calibre guns at the same target (fall-of-shot confusion) and maybe 3) making critical hits to secondary turrets a bit more effectual (it seems unlikely in any given engagement that a ship would ever lose more than one turret - given the very decisive damage results, ships are likely to be sunk well before their combat effectiveness is reduced in this specific way).

Having said all that, I have for a long time had an idea to make something akin to the Mikawa quick battle system, though I was considering using the underrated Axis & Allies War at Sea rules as the basis. My idea would basically be a glorified game of the class Battleships. I will see what I can develop. However, in the mean time, I will be trying to play a lot more Nimitz (and Halsey).

Sunday, 7 April 2024

Rommel in 6mm - Ruweisat Ridge

We had our first game of Sam Mustafa's Rommel wargame using my 6mm Afrika Korps (DAK) and British 8th Army minis, trying out the Ruweisat Ridge scenario from the online compendium of Rommel scenarios. I commanded the Allied forces and my opponent, whose first game this was, chose the DAK.

The scenario

Ruweisat Ridge runs roughly east-west and is key terrain for the El Alamein battlefield. The battle takes place 1 July 1942 as part of the First Battle of El Alamein. To win, the DAK must capture the objective on Ruweisat Ridge and at least two other objectives and hold them until day's end, in order to open up the Allied flank south of the El Alamein box. The British must simply to prevent this from happening.

The scenario map I made using the map editor function in the Panzer Corps computer game and LibreOffice Draw. Obviously we use hexes rather than squares.

The forces

DAK has three very much weakened but nevertheless balanced division elements: 15 Panzer Division to the north of the ridge, 21 Panzer to the south, and 90 Light Division, coming on from reserve from the north. 8th Army has two infantry brigades (18th Indian and 1st South African), and two armoured brigades (one of which, 4th Armoured, comes on from reserve) and some army assets including Robcol (elite infantry) and 25 pounders. Being short one Panzer III model, I substituted a StuG IIID (5. Kompanie, Sonderverband 288) for 90 Light Division. I couldn't find an Order of Battle for 22nd Armoured that matched the scenario, so I subbed in 23rd Armoured.

The German attack

15 Panzer moved toward the northern hill objective while relentlessly attacking 18th Indian Infantry Brigade's northern sector (11th Sikhs), using their Pioneer infantry to good effect eliminating entrenched positions. 21 Panzer's infantry cautiously skirted the minefield and positioned itself to attack 18th Indian's southern sector held by the 3rd Gurkha Rifles, while the division's armoured component raced west to engage in a swirling series of tank battles with 23rd Armoured. The Luftwaffe was called in and bombed the Allied troops in their trenches. A sneaky use of the Intercepted Signals event caused the 18th Indian's artillery (157th Field Regiment) to think they were retreating and move out into the open desert to the southwest - putting them out of position and at risk to 21 Panzer's armour for the rest of the game.

The British respond

1st South African Brigade raced into position to shore up the Allied northern flank, with the Natal Carbineers taking up a strong defensive position on the northern hill and the Transvaal Scottish with supporting Matilda IIs holding off 15 Panzer on the flat ground. 11th Sikhs attempted a counterattack against 15 Panzer, but this was beaten back. 23rd Armoured inflicted heavy losses on 21 Panzer's armour but were eventually destroyed, along with the aforementioned 157th Field Regiment, which had been tricked by German sigint into retreating to a vulnerable location. Allied P-40s and Hurricanes tore up the German tank columns, helping to weaken their further attacks.

GHQ miniatures on vinyl tile bases with printed paper unit cards, cellotaped to allow use of whiteboard markers. The smoke is where an M3 Grant unit used to be (they were wiped out).

Panzerregiment 5 defeats 23rd Armoured after a tough tank-on-tank engagement.

15 Panzer and 21 Panzer assault 18th Indian Brigade in their trenches, bending back their line to the north and inflicting very heavy losses. (The 's/f' tokens are for tipped units, and the black smoke is from the flamethrowers of the German pioneers). The minefield is visible at left (small lumps of Selleys on vinyl tile and painted).

Reinforcements arrive, and the Germans gain the upper hand

4th Armoured Brigade eventually arrived to reinforce the Allied northern flank, but ended up spending much of it's time driving back and forth trying to protect the Allied MSR from the tanks of 21 Panzer, which had broken through. However, they did help 1st South African Brigade counter 90 Light Division with Sonderverband 288, which arrived at the same time from the north.

The infantry and tanks of 15 Panzer eventually succeeded pushing back the 11th Sikh Regiment to the foot of Ruweisat Ridge, while also dealing with the 1st Transvaal Scottish, which fought well but not well enough. The last of the infantry's Matilda II support was destroyed in this series of attacks.

21 Panzer's infantry finally overwhelmed the hitherto sturdy 3rd Gurkha Rifles and took the central objective, moving forward along the southern edge of Ruweisat Ridge.

The Sikhs, Gurkhas and Transvaal Scottish are pushed back to the ridge.

The Natal Carbineers and Duke of Edinburgh's Own managed to hold off repeated uphill assaults by the infantry of 90 Light Division, now to be known as 'Carbineer's Kopje.'

The South Africans, almost surrounded, hold Carbineer Kopje.


Late afternoon on 1 July - the Germans have broken through in the south and advanced in the centre, while the British still hold the northern hill and Ruweisat Ridge itself. Tanks from 4th Armoured (right of picture) desperately attempt to keep the British MSR open to prevent the whole force from being outflanked and cut off.

Final assaults at dusk

With the sun going down and just 2 turns remaining (and game time running out IRL, both I and my DAK opponent realised the main objective, Ruweisat Ridge, was still not taken. Without the ridge objective, the Germans could not win. Therefore they rushed into attack Robcol, which was now reinforced by the Transvaal Scottish. Using the Their Finest Hour tactic, and with the aid of favourable dice rolls, Robcol and the South Africans managed to hold off flanking attacks and bring the game to a close draw, though an operational defeat for the Germans, as they would not be able to outflank the Alamein box.

If the battle had continued for a second day it is very likely that the encircled and worn down Allied troops would have been defeated. However, it would greatly depend on the relative supply and reinforcement situation. The Germans were short of both, and had taken substantial losses to their best units, while the Allies had more troops and fuelled-up vehicles on the way. This outcome was satisfactorily close to the real history of the battle.


Positions at dusk: the Germans attempt but fail to take the ridge, and Carbineer Kopje still remains in Allied hands.
                                        
General scheme of the battle, including final positions of units.


Schutzen Regiment 200, which already wrested the central objective from the Gurkhas, attempts to take the ridge but is beaten back by Robcol and the Transvaal Scottish.

At the end of the day, with Robcol and the South Africans surrounded, 4th Armoured in turn surrounds the very worn out Jager Regiment 155.

Discussion

The game showcased the Rommel ruleset and really demonstrated the need for commanders to focus on the key objectives while retaining a broader situational awareness to win the game. There were also some great moments of heroism and tactical skill be various formations, which I think indicates the value of including unit names on the cards and gives a hint as to how great Rommel could be for campaign games.

My opponent really enjoyed the game - he was inspired by the Little Wars TV Peleliu campaign to try out bigger games - grand tactical or operational. I will now be looking into various hex and counter wargames set in the North African theatre to find material to create a Rommel campaign with the miniatures I have available.

I do wonder though about different ways to handle the Tactics and Events in Rommel - whether cards would work better, and whether there should be more instances of particular tactics or more variety of effects than just combat value increase and shifts up or down. I'm sure all alternatives were play-tested, but I'm always thinking adjustments, expansions and house rules anyway.


The losses taken by both sides. (One of the tanks fell of its base, but no worries, it's safe).


Thursday, 14 March 2024

Rue du Dr Poulain - Chain of Command, France 1940

 We had the first half of the first battle of our second Chain of Command France 1940 campaign today (called it part-way in due to time constraints).

A German motorcycle recon platoon supported by a platoon of three Sdkfz 221 or 223 armoured cars has attacked the southern section of Montmedy and has gained a foothold across the bridge into town. Two British platoons from D Company, 12th Derwent Light Infantry, with a pair of OQF 2 pounders and at least one Vickers machine gun are holding the crossroads, despite taking some heavy fire. They have inflicted casualties on one German section and destroyed one armoured car, but it remains to be seen if they can hold on...

Soldiers from 18 Platoon fire at the Germans (Peter Pig miniatures).

The overall situation. Many of the British Junior and even Senior Leaders are wounded.

German armoured car (Battlefront miniatures).

OQF 2 pounder from the 68th Anti-Tank Regiment finally got a penetrating hit on an Sdkfz.223 (Old Glory miniatures).


Saturday, 9 March 2024

The Liveries of Others II - German Section for Chain of Command

Edit: I painted a second section of a mate's 15mm Germans for Chain of Command, so I've added these at the bottom of the post for completeness.

In the second instalment of The Liveries of Others, this time I painted a section of German infantry (who will be either Aufklarungs troops or Schutzen) for a mate to use in our upcoming Chain of Command campaign to be set around the town of Montmedy in 1940.

These miniatures are, I believe, older Battlefront metals. One guy seems to be wearing a camouflage smock but as these will be depicting early war Germans I decided not to paint the camo and just consider it a field jacket that's a bit too big for him. (I will have to ignore that the guy in the hat is carrying an MG42 rather than an MG34 - at this scale, who will notice, right?) The corporal is missing the barrel of his submachinegun but that can't be helped (anything I add will just snap off again).

All bases are magnetised (cut-up P-Plates), and these guys are ready to race ahead of the Panzer columns to find and fix the undaunted Derwent Light Infantry.


Many weeks later, I painted the below, second section of Chain of Command Germans. These older Flames of War metal miniatures do have a good mix of poses that makes them fairly engaging to paint.


Monday, 12 February 2024

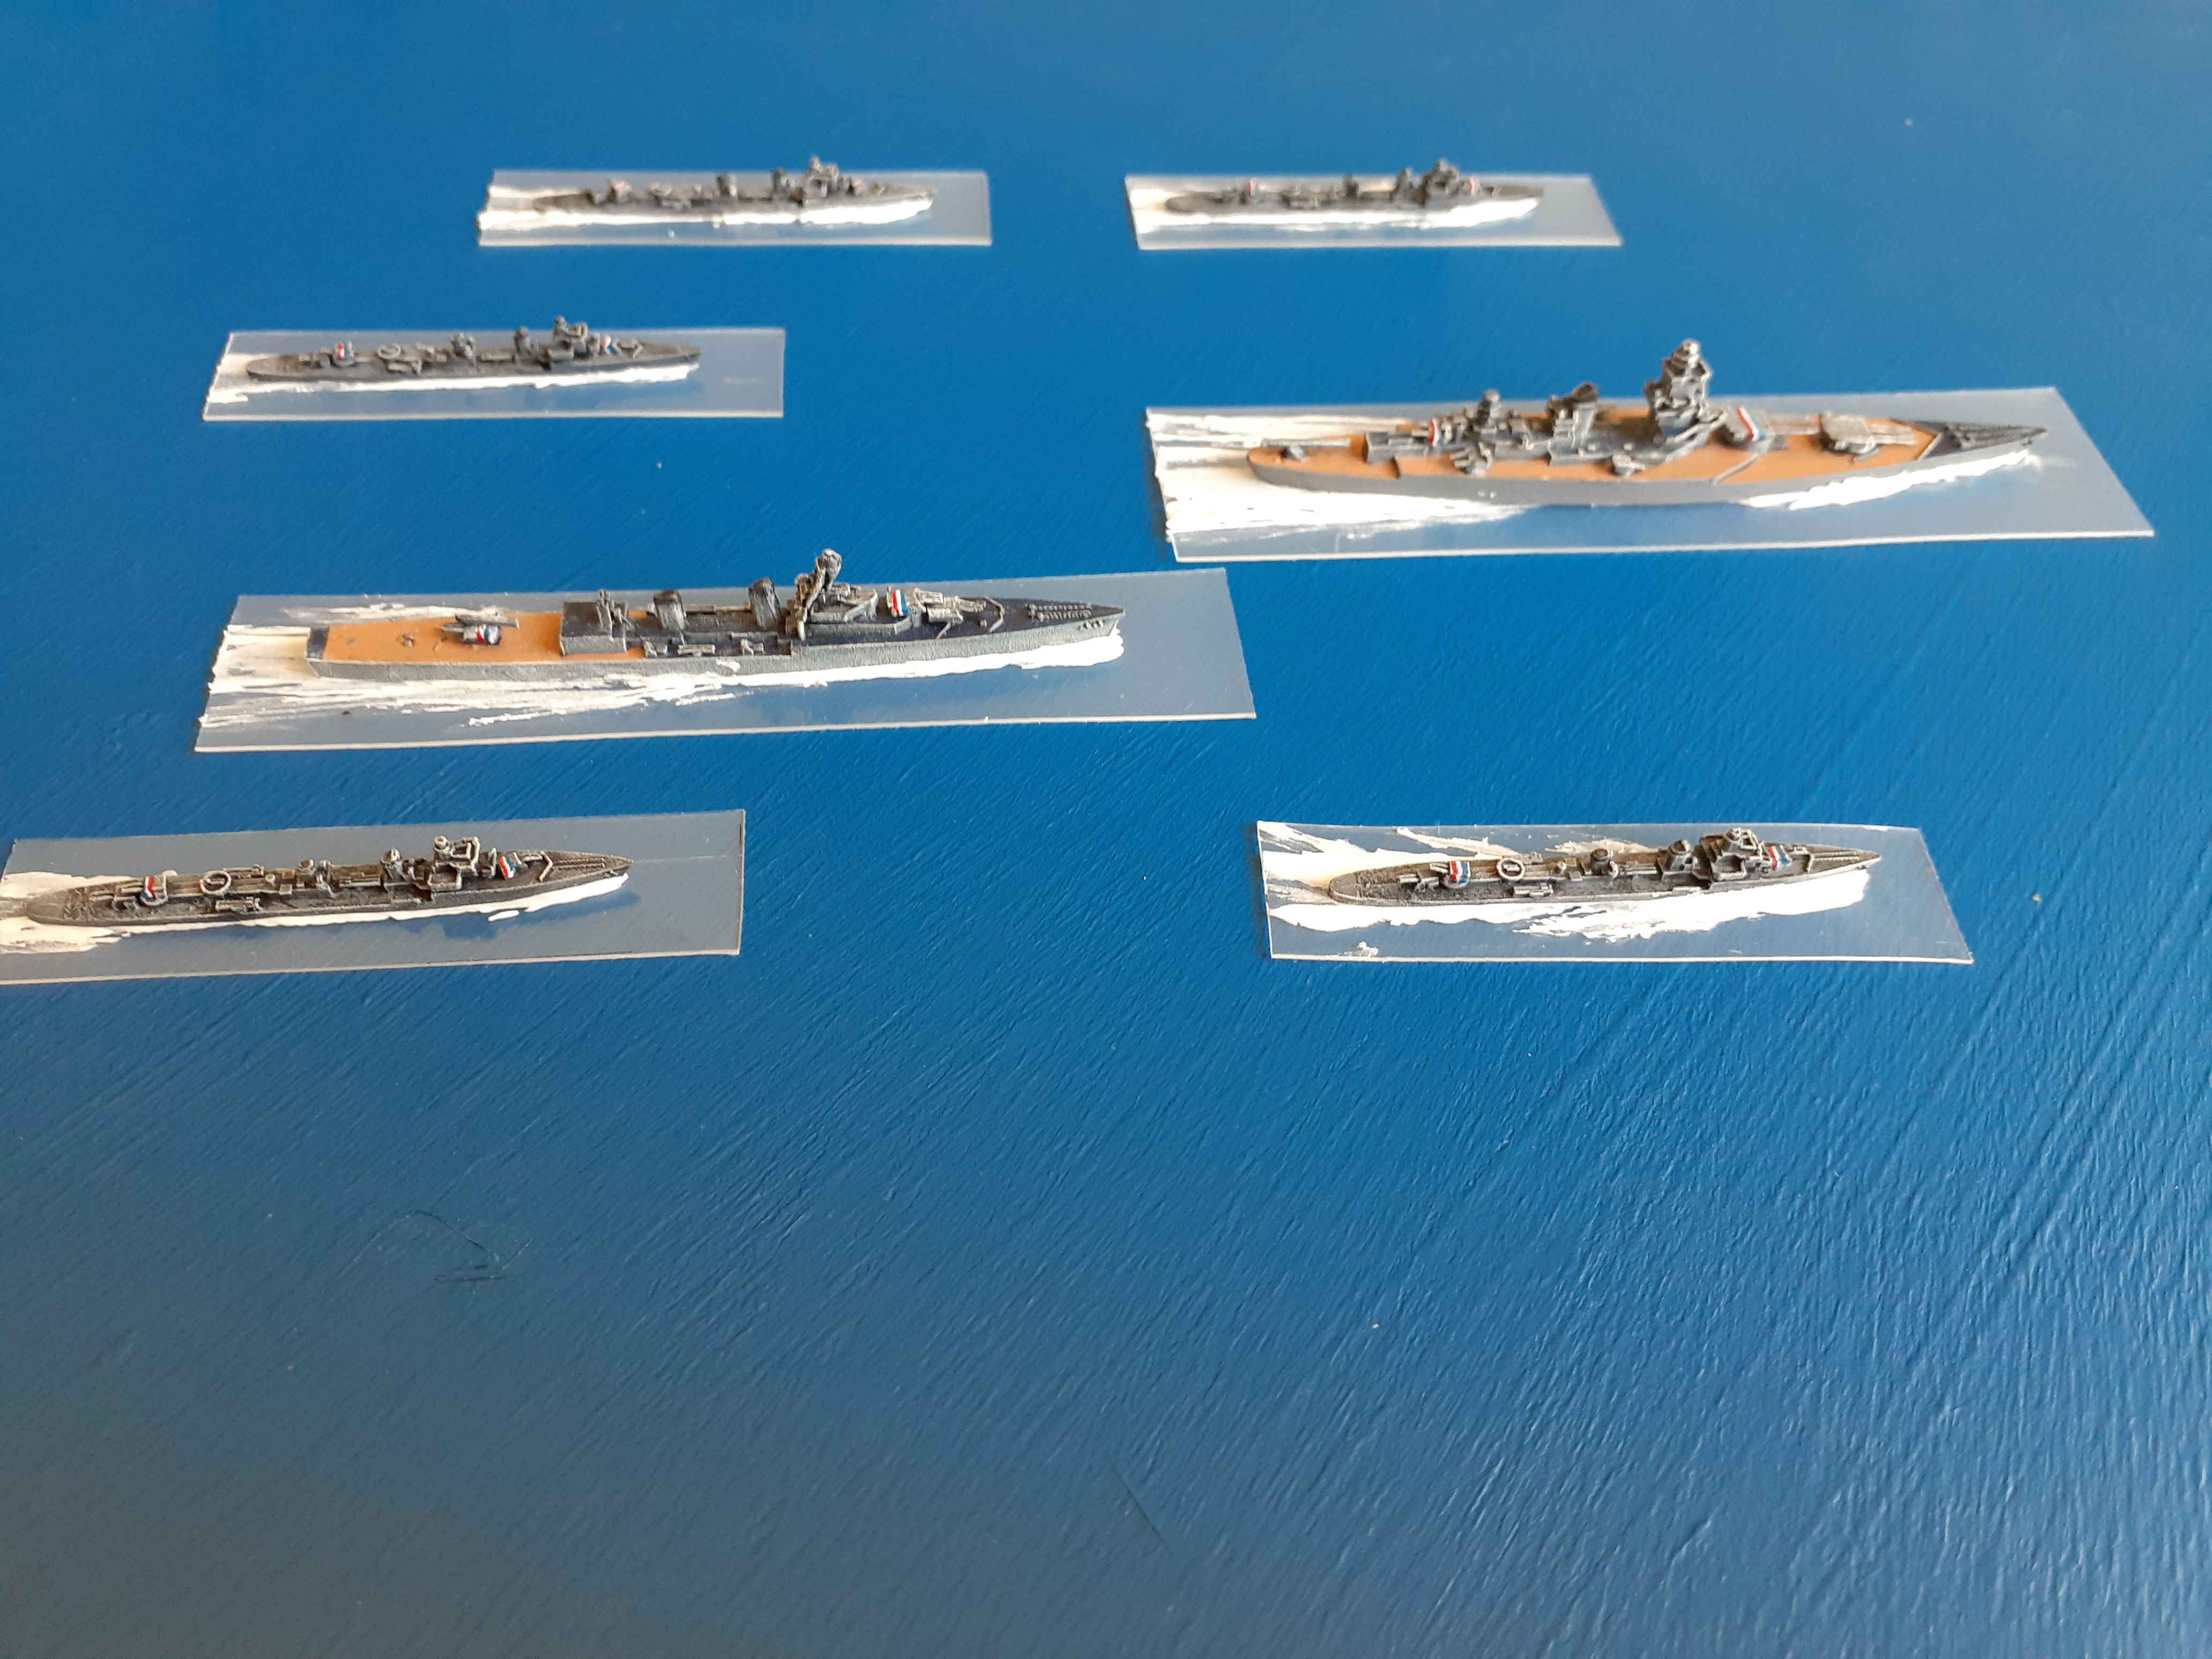
French Navy in 1/2400 for Nimitz, General Quarters III, Naval War, etc.

In 2024 the guys in the gaming group will be getting into playing NIMITZ (by Sam Mustafa). Additionally, another group of gamers here play a lot of General Quarters III and I should get into that too. If others are willing to give it a go too, I'd be interested in learning the Naval War set of rules, which looks really good so far - it's free, nicely packaged, and can be found here: (https://www.naval-war.com/).

Due to various circumstances, NIMITZ and WW2 naval wargaming generally will have to be a secondary project for me, so I decided to get just a squadron to participate in multiplayer games. For maximum flexibility, I picked up a balanced group of the available CinC 1/2400 ships for the French Marine Nationale - a navy that nobody else in the gaming group was doing, and a force which could plausibly participate on either the Allied or Axis side, and (with some stretch of the imagination) the Pacific Theatre as well as the Atlantic and Mediterranean.

Marine Nationale expeditionary squadron on fleet exercises (CinC Miniatures).

The miniatures

As is usual for CinC the miniatures are well-made and finely detailed, though of course the gun barrels are a little flexible and potentially fragile. This is less of a concern for ships than for tanks where the barrels overhang the main body, so not too much of a problem. I painted the ships very simply with black undercoat and layered drybrushes of various greys tending up to Silver Grey (illustrations of French navy ships seem almost white). The turret stripe markings are apparently more a thing during the Vichy years, but they look good and will help distinguish my ships on the tabletop.

For the bases, I went with my favoured, cheap method of plastic cut from even and clear sections of takeaway food containers with the ships placed on top of a line of Selleys and then slid forward to give the impression of a bow wave. I was a bit impatient in doing this, so the wave effects are not ideal, but hopefully look fine at tabletop distances.


The squadron flagship is an advanced (though flawed) battleship of the Dunkerque Class,

backed by a La Galissionniere Class light cruiser,
and protected by no less than five state-of-the-art Le Hardi Class Destroyers.


Tuesday, 7 November 2023

Assault on Montmedy - France 1940 , Chain of Command

Some weeks ago we fought Battle 6 - the last battle of our France 1940 Chain of Command campaign (or, hopefully, only the last battle of the first chapter of the France 1940 campaign).

In preparation for this battle I made quite a few paper buildings with the intention of filling up around half a 6'x'4' table (I probably got enough for a third of a table in the end, though still have a few unbuilt structures, like a large church to finish off). For this I used a BattleLands Normandy 1944 set from Microtactix available from Wargames Vault and printed out several copies of some of the smaller buildings. This set is really comprehensive and looks great, especially with the extra bits like the awnings on the shops and cafes.

Prelude

Major Roscoe Sloan lowered his binoculars and scowled at the column of grey trucks, cars, motorcycles and armoured vehicles - still distant but closing rapidly. The 12th Derwents were on the back foot, thanks largely to the disappointing performance of his own A Company. MAJ Sloan turned his scowl toward one of those disappointments: 2nd Lieutenant George Stephens, OC leading the composite 7/8 Platoon, standing beside him: "Here they come. Make sure your Platoon is ready, and tell the AT gunners to watch and shoot. Dismissed." The frail-looking young lieutenant saluted with a "yessir" and hurried off to his platoon, holding the buildings at the centre of the British line on the main road into Montmedy.

Next, MAJ Sloan turned to his other subordinate, Sergeant-Major (WOIII) Aiden Bannister, and simply nodded: Bannister knew what was needed. The short and stocky Australian leading 9 Platoon returned the nod, saluted and jogged off toward his platoon's fortified 'keep' at the left of the position, gripping his new Thompson submachinegun by its wooden stock. MAJ Sloan returned to scowling at the approaching Germans. There were three other companies in this battalion, but they were tied up holding off the Germans on the flanks. If the Germans broke through A Company now, the whole battalion would be withdrawn toward Sedan and the town left to the French to do their best.

Setting Up

The battle was a modified version of Big Chain of Command with three platoons a side. The Germans would have a few Panzergrenadier platoons in trucks from the Grossdeutschland Regiment, a five-tank Panzer III platoon, and an Sdkfz 222 armoured car and a motorcycle reconnaissance section (Folke-Baptiste and his riders to lead the assault and get more Iron Crosses!) in support. The British had two rifle platoons (7/8 Platoon composed of the remaining battle-ready men from 7 and 8 platoons, and the mostly intact 9 Platoon) and a supporting French reserve armour platoon of FT-17s.

The Germans Rush Ahead

Both sides rolled 11 for Force Morale and the Germans got the first phase. Folke-Baptiste's motorcyclists raced down the road toward the British left flank held by 9 Platoon, followed close behind by a Panzergrenadier section in trucks and their platoon commander in a field car. A 9 Platoon section under CPL Weston deployed to the three-level corner hotel (the Platoon's 'keep') and a French FT-17 from the Peloton Blindee Montmedy commanded by LT Felix Florian appeared at the end of the road. Both units opened up on Folke-Baptiste's men and the Germans took some hits.

A German light mortar opened fire on 9 Platoon's keep, inflicting a casualty, and more Panzergrenadier trucks appeared on the road to head toward the British positions. As the German motorcycle recon section tuned off the road toward cover, a the British opened up on them with a Vickers MMG from the top floor of the hotel. The 9 Platoon rifle section, now under the direct control of Sergeant-Major Bannister, joined in. The combined fire inflicted several casualties. Accompanied now by just a handful of survivors, Folke-Baptiste rushed into a house opposite the British and prepared to fire back with his MP38.

Grossdeutschland advances down the road, taking fire. The German motorcyclists have already rushed forward into cover.

Exchanging Heavy Fire

Folke-Baptiste and his survivors (the MG38 team of his squad) exchanged heavy fire with a Vickers MMG in the upper levels of the keep and growing numbers of 9 Platoon troops, as the rest of the platoon's sections deployed and opened up from windows and doors across the street. Soon, only the German corporal was left standing - wounded, blasting away with his sub-machinegun, shouting defiantly and calling for someone to back him up.

The Vickers MMG switches fire between Folke-Baptiste's motorcycle troops and oncoming Grossdeutschland trucks on the road.

Folke-Baptiste, alone, wounded, his section fallen around him, holding the fight almost single-handedly.

The German motorcycle troops had been mostly dealt with or rendered combat ineffective by the fire of Bannister's 9 Platoon, LT Florian's FT-17, and especially LCPL Thomas O'Shaunessey's section. British attention was now drawn to peppering the Grossdeutschland trucks and cars racing down the road toward them, inflicting further casualties and even killing the Panzergrenadier platoon leader. In return, several British soldiers were hit, including O'Shaunessey himself, who was severely wounded.

The advancing Germans take heavy fire from 9 Platoon's strongly-held defensive line...

... It looked like there was no breaking through on this flank.


The Germans try an armoured advance

In the German centre they deployed a Panzer III and then an Sdkfz 222 to push down the road. Within moments, they came under fire from an OQF 2-pounder anti-tank gun hidden in a small reserve on a roadside corner. Return fire from the Germans quickly killed the gun commander, Bombardier Millard Barrett.

LT Stephens (right lower corner) shouts target indications to the OQF 2-pounder (left lower corner, here represented by a yet-to-be-invented Sexton 25 pounder, because I forgot my models!) 

However, just as quickly, LT George Preston Stephens, leading the remnants of 7 and 8 Platoon, took control. Seeing the problem, he began shouting down target indications from the third floor of a hotel building. Despite continuing German fire, the 2-pounder under the command of Lance Bombardier Glenn Elmo was able to hit, damage and drive off the Panzer III. A second Panzer III turned up and was then also driven off by the 2-pounder with help from LT Stephens, though at the cost of another man, Private Darcy Osborne, KIA.

Aftermath

With the retreat of the Panzers and Grossdeutchsland and 90the Recon's advance bloodily stopped, the Germans quit the field. At last! A British victory! Finally a win for the 12th Derwents!

The British had lost two men killed (from the 2 pounder unit from the 1st Battery, 68th Brigade Anti-Tank Regiment), one many severely wounded (LCPL O'Shaunessey), and three other men slightly wounded. Major Sloan has recommended SGT Aiden Bannister for the Military Medal for handling the defence of the British keep and left-flank crossroads, and LT Stephens has somewhat redeemed himself.

An understrength 9 Platoon plus a single 2 pounder practically held the entire battle for the British, with 7/8 Platoon not really participating except as a force-in-being for the centre and right. The Germans were perhaps too reckless in driving down the road full-tilt in softskins and relying too much on the Panzers. Despite the lack of movement on the British side, it was a fun and challenging battle nevertheless.

As for Folke-Baptiste, he now has the Wound Badge, on top of the Iron Cross, and is trying to will himself through his recuperation to return to his unit at the front as soon as possible.

An overview of the battlefield during the game.

A very approximate map of the table, showing British deployments and German advances throughout the battle.


The Campaign Concludes - Overall German Victory

Montmedy was secure, at least for now. However, with five German victories and only one Allied win across the six battles of this campaign, it is clear that the British position here will very soon become untenable and the Derwents will have to withdraw or be outflanked.

Hopefully soon we will continue to follow the exploits of A Company of the 12th Derwent Light Infantry and their nemesis Folke-Baptiste of the 90. Aufklarungsregiment in a second campaign to follow this one. Chain of Command is a brilliant game, perfect for linked story campaigns, and the Platoon Forward and At the Sharp End supplements really add to the overall experience. The Too Fat Lardies have really done well with the whole Chain of Command game experience.

Next I would like to try a map-based campaign for Chain of Command, with a company or two a side, perhaps representing a fighting withdrawal by the 12th Derwents (and hopefully some French units) toward Sedan, pursued by fast-moving Grossdeutschland and 90. Auflkarungs units.

The overall situation for A Company, 12th Derwents is as follows. Of the 101 men of 7, 8 and 9 Platoon and the Company HQ who started the campaign, 70 are still fit to fight, 12 were severely wounded (not to return), and 19 were killed, including the Company 2IC. Most men have been wounded at least once. I put together records of the killed and seriously wounded from both the company and its attached supporting units:

The seriously wounded, including three wounded and captured.

Wall of Remembrance - the KIA.


Tuesday, 5 September 2023

The Rail Bridges - Battle of France 1940 Chain of Command

You should complete the writeup soon after, preferably the day of, the game. Unfortunately weeks have passed and a lot has happened since we played this penultimate battle of our Chain of Command Montmedy campaign, so I've forgotten exactly what happened. However, I do remember it was a great game, a great challenge and a learning experience.

The Mission

In the immediate aftermath of A Company's retreat from Verneuil-Grand in the face of 90. Aufklarungs' rapid advance, 11 Platoon, B Company of the 12th Derwents was tasked with holding the railway overpass and the bridge over the River Chiers while engineers from 5 Platoon could arrange their demolition. The railway line enters Montmedy, and the Derwents have been ordered to defend the town. However, considering the speed of the German advance, the higher-ups expect the town to fall, so demolishing the rail line at these points is considered important to slow any German rail movements into Montmedy.

We played the 'Going Out With A Bang' scenario from the Blitzkrieg 1940 handbook, with slight modifications to fit the map positions of the 'culverts' to be blown.

The mission map (Google Maps plus edits in MS Paint).

11 Platoon, I decided, would be a bit more representative of a hastily-raised and -trained Territorial Army formation, which the 12th Derwents (kind of) are. Therefore 11 Platoon, under the leadership of Sergeant-Major Silvester Victor, are a green-level LOC Platoon, but hey, at least they have a (single) Bren gun. In support I brought two Engineer Demolition Teams (required to blow the rail bridges), a Vickers MMG and an extra couple of guys with an AT Rifle.

The Battle

The Germans had the first turn, so coming down the road were a section of a motorcycle recon platoon and a full platoon of armoured cars.

First turn. The bypassed Maginot casemate is on-table but was not part of the battle.

The first Brits on the table were an Engineer Demolition team at the river bridge, who got to work immediately under the direction of Sgt-Maj Victor (no photos unfortunately), and a section to the north of the road to warn the Germans off too rapid an advance.

British rifle sections, with 2 Section in foreground, deploy to hold the rail overpass. (Peter Pig miniatures).

3 Section, in kilts, took a real battering but held the bend in the road (until they were whittled down and broken near the end of the game).


The Vickers MMG deployed to the hill and initially laid down some effective fire on advancing German motorcycle infantry. However, the Germans rapidly concentrated on, and broke them with fire from the motorcycle infantry and armoured cars.


A German armoured car leads the advance.

The British concentrated fire on an understrength motorcycle recon section on the road and wiped it out before it had a chance to deploy, inflicting some damage to the Germans' Force Morale. 2 Section contributed the most to this success, as Corporal Jerrold 'Napoleon' Hunnicut (no idea why, but the random name generator gave him that nickname) effectively used 'Five Rounds Rapid' to boost the section's firepower.

An understrength motorcycle recon section is destroyed on the road, as the German commander drives onward.

Ready ... NOW!

Meanwhile, the priority was always demolishing the rail bridges/overpasses. The engineers had rigged the rail bridge over the Chiers to blow and pulled back to the other side, just as a dismounted German motorcycle recon section arrived. I needed a full Chain of Command die to push the plunger, which I luckily already had - it was all in place - time to blow the bridge (and hopefully take out some Germans with it...)


... click

Nothing happened. There was no explosion.

I rolled to detonate the charges on the bridge and rolled a malfunction, meaning the charges had to be rigged again. Since the Germans were already on the bridge in strength and had started to remove the explosives, and with no second Chain of Command die in sight, I realised I had no choice but to concentrate on trying to get the second objective - the overpass - rigged to blow.

With two Engineer teams on the job it did not take long to get the explosives (almost) ready. However, getting a second Chain of Command die was just not happening (the downside of taking a Green LOC Platoon with only four Command Dice).

The explosives are 95% complete on the second demolition objective, but where is the plunger!?

The Second Objective

Also, German firepower was starting to tell, and 11 Platoon's Force Morale began to plummet as 1 and 3 Section (newly arrived on the hill) were driven off, and 2 Section was hit hard, even CPL Napoleon (I mean, CPL Hunnicut), was wounded. I was down to just two Command Dice at this point and barely a 5 was seen. With no way to blow the rail overpass, 11 Platoon had to retreat, leaving a few men behind as POWs and quite a few more dead.


11 Platoon is beaten. Check out all the shock!

After taking about 65-75% casualties, 11 Platoon is pretty well lost, though a few characters might be brought back for the next battle. Several of the 5 Platoon engineers were killed or wounded too, and of course the objectives were not met.

The next battle, Battle 6 of the campaign, is coming up in the near future. It is expected to be a big one, as the Germans assault the town of Montmedy directly, and the 12th Derwents will throw whatever they can into the fight!